


Quick answer
If you want a simple home recording setup for under $500, start with a two-input audio interface, one solid microphone, one pair of closed-back headphones, a mic stand, and the recording software that makes the most sense for your computer and workflow. You do not need studio monitors on day one. You do not need expensive plug-ins. You do not need a giant pile of gear that makes you feel productive while teaching you nothing.
A beginner setup should be small, dependable, and flexible enough to record vocals, acoustic guitar, electric guitar direct, voiceovers, or basic demos without turning your room into a full-time project.
RELATED: Sony 7506 Headphones Review
Who this setup is for
This guide is for you if you want to:
- Record vocals at home
- Record acoustic guitar or electric guitar
- Build a simple singer-songwriter setup
- Start making demos without wasting money
- Get a usable setup in a bedroom, office, or apartment
- Avoid buying random junk just because the internet told you to
This guide is not for you if you need to:
- Record a full drum kit
- Track a whole band at once
- Build a multi-mic studio right away
- Spend three weeks comparing converters before you’ve recorded one take
The starter setup
For most beginners, a sensible home recording setup looks like this:
- A computer you already own
- A DAW
- A two-input audio interface
- One microphone
- One pair of closed-back headphones
- One mic stand
- The cables needed to connect everything
That is enough to start. It is enough to learn. It is enough to make mistakes that actually teach you something.
What to buy first
1. Use the computer you already have
You don’t need a heroic machine to start recording at home. A reasonably modern laptop or desktop is usually enough for beginner sessions, especially if you are recording a few tracks at a time instead of building giant projects loaded with virtual instruments and effects.
What matters most is stability. If your computer can run your DAW smoothly, handle basic editing, and avoid choking every time you arm a track, you are in business. A boring, reliable machine is better than an impressive one with weird issues.
2. Pick one DAW and stick with it
Your DAW is where everything happens. You record in it, edit in it, arrange in it, and mix in it. Beginners often waste time asking which DAW is best when the more useful question is which one they will actually learn.
Good beginner options include:
- Reaper
- GarageBand
- Logic Pro
- Ableton Live
- FL Studio
- Pro Tools Intro or Artist
If you’re on a Mac and want the easiest entry point, GarageBand is a very reasonable place to start. If you want something inexpensive and flexible, Reaper makes a lot of sense. If you are a beatmaker, FL Studio or Ableton Live may fit better.
The important thing is not selecting the perfect DAW. It is learning one well enough that it stops being the obstacle.
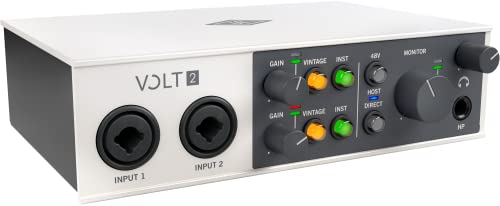
3. Buy a two-input audio interface
This is the center of the setup. The audio interface lets you plug in microphones, instruments, and headphones while sending audio cleanly in and out of your computer.
For beginners, a two-input interface is usually the sweet spot. One-input models can work, but the price difference often is not big enough to justify the extra limitation. Two inputs let you record a vocal and guitar, use two microphones, or just keep your options open.
Good beginner-friendly choices include:
|
Best Premium Preamps

|
Best for Vintage Character
|
Best for Visual Metering

|
Best Overall Beginner Pick
|
|
$295.00
|
$179.00
|
$199.95
|
$224.99
|
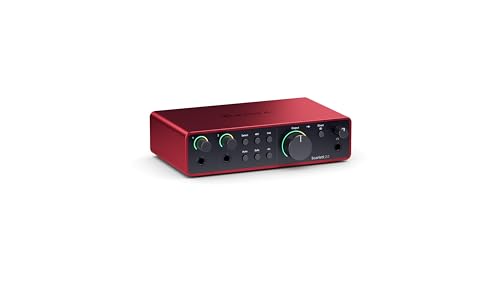
If you’re trying to stay close to budget, the Scarlett line is still a practical entry point. If you want excellent metering and a more premium feel for the price, the MOTU M2 is a strong option. If you want something with a slightly more styled personality, the Volt 2 is worth a look.
Don’t overbuy inputs unless you already know why you need them.
4. Get one good microphone
Beginners often get lost here, so keep it simple.
If you want one versatile first microphone, start with one of these paths:
- A dynamic mic if your room is noisy, reflective, or untreated
A condenser mic if your room is reasonably controlled and vocals are your main focus
- A dynamic mic like the Shure SM58 or Shure SM57 is often the safer first buy. These mics are durable, forgiving, and useful on all kinds of sources. They are less likely to exaggerate a bad room.
- A condenser mic like the Audio-Technica AT2020, Rode NT1, or Lewitt LCT 240 PRO can make sense if you want more sensitivity and detail for vocals or acoustic instruments. But that extra sensitivity can also mean extra room noise, extra reflections, and extra disappointment if your space sounds rough.
That is why a humble dynamic mic often outperforms a cheap condenser in a small bedroom.
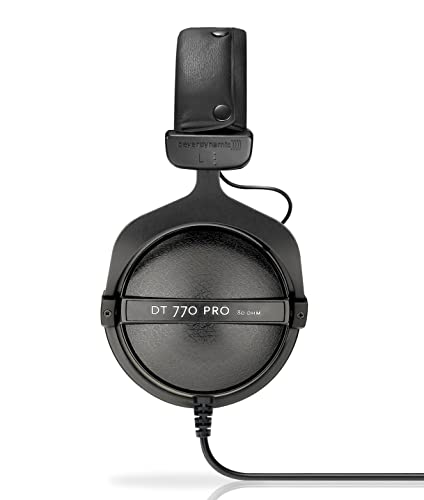
5. Use closed-back headphones first
If you only own one pair of headphones for home recording, they should usually be closed-back.
Why? Because closed-back headphones help reduce bleed when you are recording vocals near a microphone. They are also practical for editing, checking takes, and monitoring without immediately needing speakers.
Solid beginner options include:
|
Best Budget Pick

|
Most Comfortable
|
Best All-Arounder

|
Industry Standard

|
|
$94.98
|
$199.99
|
$159.00
|
$113.00
|
You can always add open-back headphones or studio monitors later. For now, closed-back headphones are the simple answer.
6. Do not forget the stand and cables
This is where a lot of beginner budgets quietly get mugged.
You will need:
- An XLR cable for the microphone
- A mic stand that is not flimsy garbage
- An instrument cable if you are plugging in guitar or bass
- USB cable or whatever your interface requires
- Possibly extra cables later if you add speakers
This stuff is not glamorous, but without it your setup is just a little museum of bad planning.
RELATED: How to Build a Livestream Setup
A simple entry-level starter rig
Here is the kind of setup that makes sense if you want to stay near the $500 mark.
Option 1: Dynamic mic path for rougher rooms
- Focusrite Scarlett 2i2
- Shure SM58
- Sony MDR-7506
- Basic boom stand
- XLR cable
- Reaper or GarageBand
This is one of the smartest beginner routes because it is simple, versatile, and less sensitive to a bad room.
Option 2: Condenser path for a quieter space
- Focusrite Scarlett 2i2 or MOTU M2
- Audio-Technica AT2020 or Lewitt LCT 240 PRO
- Sony MDR-7506 or HD 280 Pro
- Basic boom stand
- XLR cable
- Reaper or GarageBand
|
|

|
|

|
|
$224.99
|
$8.09
|
$113.00
|
$56.99
|
This works well if your space is fairly quiet and you care mostly about vocals or acoustic instruments.
Quick gear comparison
Dynamic mic vs condenser mic
Choose a dynamic mic if your room is untreated, reflective, or noisy. Choose a condenser mic if your room is quieter and you want more sensitivity for vocals or acoustic instruments.
Focusrite Scarlett 2i2 vs MOTU M2
The Scarlett 2i2 is the safer mainstream beginner pick with broad familiarity and simple setup. The MOTU M2 is a strong choice if you want better front-panel metering and a slightly more premium feel.
Headphones first vs studio monitors first
Start with headphones if your budget is limited or your room is untreated. Add monitors later once the basic recording chain is stable and you have a better sense of the room.
What you don’t need right away
This matters because beginners are constantly told they need more.
You don’t need:
- Studio monitors on day one
- A rack preamp
- A channel strip
- Expensive plug-in bundles
- Acoustic foam all over every wall
- A dedicated vocal booth
- A second microphone just because it feels professional
- A larger interface than your actual needs justify
Now, later on, some of that may make sense. But at the beginning, it is usually smarter to learn recording basics before expanding the rig.
Do you need studio monitors?
Not necessarily.
Studio monitors are useful, but they are not mandatory for a beginner who is trying to stay on budget. If your room is untreated and your money is limited, decent headphones can be the more practical starting point.
If you eventually add monitors, start small. In a bedroom or office, compact models usually make more sense than bigger ones. Common options in this space include JBL 305P MkII, Yamaha HS5, KRK Rokit 5 models, Kali Audio LP-6, and Adam Audio T5V. (See current prices)
But if adding monitors means blowing the whole budget while ignoring the microphone, interface, or room, skip them for now.
Your room matters more than you want it to
The room is the annoying truth in all of this.
A great microphone in a bad room can still produce disappointing recordings. A modest microphone in a decent spot can sound much better than people expect. You don’t need to transform your room into a recording temple. Start smaller.
Try this first:
- Record away from bare reflective walls
- Use rugs, curtains, bookshelves, and soft furnishings where possible
- Avoid placing your mic in the center of a hard, boxy room
- Use a quieter corner if that helps
- Turn off noise sources you can control
If you have a closet full of clothes, that can sometimes work as a decent vocal area. If your room is bright, empty, and echo-heavy, a dynamic mic may save you a lot of grief.
The biggest beginner mistakes
Buying gear before defining the job
If you do not know whether you are mainly recording vocals, guitar, podcast-style speech, or beatmaking, your shopping gets sloppy fast.
Overspending on one piece
A pricey mic does not fix a noisy room, a weak interface, or bad headphones.
Ignoring the room
This is one of the most common mistakes. People obsess over microphones and skip the part where their room sounds bad.
Buying studio monitors too early
Speakers are useful, but they are not always the smartest first upgrade if everything else is still unstable.
Chasing “pro” gear too soon
You don’t need gear that makes sense for someone recording bands every week if you are still learning how to set input gain.
The best upgrade path after your starter setup
Once your basic setup is working, your next upgrades should come from actual problems.
- If your vocals sound too roomy, work on the space or consider a different mic.
- If editing in headphones feels tiring, add monitors later.
- If you need to record two sources at once and cannot, your interface may need to grow.
- If your setup feels cluttered and annoying to use, better stands, cable management, and layout may help more than another plug-in.
A good home recording setup grows in response to friction. It should not grow because you got bored and opened five tabs.
A beginner checklist
Before you hit record for the first time, make sure you have:
- A computer that runs your DAW reliably
- A DAW installed and tested
- A working audio interface
- A microphone that suits your room and use case
- Closed-back headphones
- A mic stand
- An XLR cable
- A quiet enough place to record
- A simple recording goal
|
|
|
|
|
|
$224.99
|
$8.09
|
$113.00
|
$56.99
|
That is the actual foundation.
Final verdict
If you are a beginner building a home recording setup, what you need is not a fantasy studio. What you need is a small, workable system that lets you record, listen back, fix mistakes, and improve.
Start with a computer, one DAW, a two-input interface, one good microphone, closed-back headphones, and the basic accessories that make the setup usable. Skip the fluff. Skip the oversized shopping cart. Skip the urge to build a “pro” rig before you have recorded a single clean vocal.
A balanced starter setup teaches you more than an expensive mess ever will.

